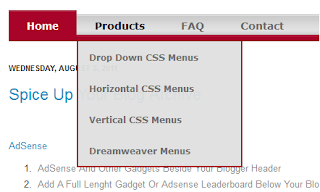
 In the last post we had a tutorial for a very unique style of drop down navigation menu for Blogger.That menu used a horizontal bar as the drop down to display links on hover.This menu uses the more conventional style of a vertical drop down to display links.
It has a large bold red on grey color scheme that stands out and looks great.As with the last menu it's built purely from Css using just two images.Below you can see the screenshot and a live demo to see it in action.

This menu is also courtesy of the awesome Free Css Menu, let's add it to your blog.
Add The Bold Red Drop Down Menu To Blogger
Remember Always Back Up Your Template Before You Make Changes - How To Back Up A Blogger Template
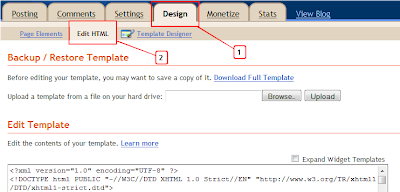
Step 1. In Your Blogger Dashboard Click Design > Edit Html

Step 2. Find the following piece of code in your blogs Html : (Click Ctrl and F for a search bar to help find the code - How To Find Code In Blogger Template Template)
]]></b:skin>
Step 3. Copy and paste the following code Directly Above / before ]]></b:skin>
Note - This is a scroll box make sure to get all the code.
/*Start Css Menu*/
.menu{
border:none;
border:0px;
margin:0px;
padding:0px;
font-family:verdana,geneva,arial,helvetica,sans-serif;
font-size:14px;
font-weight:bold;
color:8e8e8e;
}
.menu ul{
background:url(https://blogger.googleusercontent.com/img/b/R29vZ2xl/AVvXsEitw3ReVeznW4M2DNX0zxzhq7rYQxuwA5I91E4HnemPzLlzRxjBx455cgGb_PbmAwKQn0EbyQX24lamZiY0F0cG4xt49JCXpqkeGzDhAXF8YvR4yzRYPIPJO46XBhQrVuXT69z0Pv1uCR85/s1600/menu-bg.gif) top left repeat-x;
height:43px;
list-style:none;
margin:0;
padding:0;
}
.menu li{
float:left;
padding:0px 8px 0px 8px;
}
.menu li a{
color:#666666;
display:block;
font-weight:bold;
line-height:43px;
padding:0px 25px;
text-align:center;
text-decoration:none;
}
.menu li a:hover{
color:#000000;
text-decoration:none;
}
.menu li ul{
background:#e0e0e0;
border-left:2px solid #a80329;
border-right:2px solid #a80329;
border-bottom:2px solid #a80329;
display:none;
height:auto;
filter:alpha(opacity=95);
opacity:0.95;
position:absolute;
width:225px;
z-index:200;
/*top:1em;
/*left:0;*/
}
.menu li:hover ul{
display:block;
}
.menu li li {
display:block;
float:none;
padding:0px;
width:225px;
}
.menu li ul a{
display:block;
font-size:12px;
font-style:normal;
padding:0px 10px 0px 15px;
text-align:left;
}
.menu li ul a:hover{
background:#949494;
color:#000000;
opacity:1.0;
filter:alpha(opacity=100);
}
.menu p{
clear:left;
}
.menu #current{
background:url(https://blogger.googleusercontent.com/img/b/R29vZ2xl/AVvXsEgHUC-LL8SabB81fqRbY6HRRTbwUEWNtkFzBOvHQwpuxpw0EGAfMPSNNRHpr9SqpWtMov9jRCcwp-hDL7Yasx8aTUSLhbSOkSn6iOxCkyFiKksp10t_c_wpwVPdyJQXlKvA-M4-jouhW99M/s1600/current-bg.gif) top left repeat-x;
color:#ffffff;
}
/*End Css Menu from http://www.spiceupyourblog.com*/
Step 4. Save your template.
That's the Css added next is to add the html for your menu.
Now go to your blogs Design Page, we will be adding the menu across your blog below the header.This area is called Cross Column and can be seen in the image below.If your blog does not have this section available you can see how to enable it here - Add Full Width Cross Column Gadgets To Blogger.
Add The Menu Html
In your blogs Design Page click Add A Gadget > Choose Html/Javascript > Copy and paste the following code into the Html/Javascript gadget :
<div class="menu">
<ul>
<li><a href="#" id="current">Home</a></li>
<li><a href="#" >Products</a>
<ul>
<li><a href="#">Drop Down CSS Menus</a></li>
<li><a href="#">Horizontal CSS Menus</a></li>
<li><a href="#">Vertical CSS Menus</a></li>
<li><a href="#">Dreamweaver Menus</a></li>
</ul>
</li>
<li><a href="/faq.php">FAQ</a>
<ul>
<li><a href="#">Drop Down CSS Menus</a></li>
<li><a href="#">Horizontal CSS Menus</a></li>
<li><a href="#">Vertical CSS Menus</a></li>
<li><a href="#">Dreamweaver Menus</a></li>
</ul>
</li>
<li><a href="/contact/contact.php">Contact</a></li>
</ul>
</div>
This is the code that makes up the menu in the demo above.Replace the hash tags (#) with your links and the text with your text.If you take a few minutes to reference the demo and the code you should see how it works.If you want to add more links you can do so in the same way, once again take a few minutes to look at the layout of the code and you will see how its done.
Template Designer Tabs Fix
If you use a template from the Blogger Template Designer there is a section of Css that will effect this or any menu you place in the cross column section.This is called tabs and you will need to remove or over ride the tabs css.I have made a short video to show you how to remove it.You can see the video here - Remove Tabs Css.
That's it simple ! Make sure to check out more of our Css tutorials and Blogger gadgets.
Drop Your Comments And Questions Below


0 comments:
Post a Comment